


For the last two decades, WordPress has been a trusted solution by large and small businesses. Despite its longstanding success and reputation, people are discovering its limitations and not cutting it in 2025. Many teams are seeking a solution that’s flexible, visual and more future proof. This is why many teams are migrating from WordPress to Webflow.
Webflow is a website builder and design tool that allows users to create websites without having to write any code. It offers an intuitive visual interface that lets users drag and drop elements onto a canvas, and then customize them to their liking. The company started in 2013, and has become a favorite in tech, small businesses, nonprofits, and Fortune 500 companies. 3 million websites were created in 2022 alone.
I discovered Webflow out of frustration using WordPress for years. It was slow, had to manage way too many plugins, and the user interface was just old school. And once I started using it, it was magical. This is why at Slam, we recommend Webflow over WordPress to all of our clients. We’ve helped dozens of organizations migrate their legacy WordPress sites to Webflow.
In this guide, we’ll teach you how to do it, too!
WordPress and Webflow: What’s Important?
We often get asked: “What’s the best web design CMS?” The answer is that it really depends on your needs, but Webflow and WordPress always come to the conversation.
Do we stick with something tried and tested; something that a lot of teams are already used to? Or do we take the leap into a no-code solution that’s newer, but has a lot of advantages that legacy platforms just don’t have?
Both platforms have their advantages and disadvantages, making it difficult to choose the best one for your needs. In this section, we'll highlight some important factors to consider when making your decision.
Here’s the breakdown between each platform:
SEO
- WordPress has a few tools built-in, but to get the most out of WordPress, you should install Yoast SEO to get things like redirects, sitemaps, rich metadata customization, etc.
- Webflow has a lot of these SEO tools built in without plugins needed.
Website Page Speed
- Webflow’s code is generally lighter-weight compared to the plug-in heavy code from WordPress. This makes Webflow’s sites faster, and easier for Google to read the content.
- WordPress sites can be optimized, but usually run slower due to the number of plug-ins. If you go with WordPress, be sure that you keep plugins to a minimum.
Page Builder
- WordPress has a few ways of going about this. People choose between a custom solution (which usually requires custom code that’s harder to make edits) or a visual builder like Elementor or Divi Builder (which is easy to use, but usually results in a slower site).
- WordPress offers a content editor for pages and blog content called Gutenberg, which is easy and powerful. However, most sites that use a visual builder only use this for blogs and CMS content.
- Webflow offers a powerful drag and drop designer that makes HTML, CSS, and JS principles intuitive.
- They also offer a lighter editor mode, which is great for editing copy, swapping assets, or managing your CMS.
Pricing
- WordPress pricing can range, but typically you’ll pay significantly more for fast and reliable hosting from a provider like AWS or WP Engine. (Avoid BlueHost, saving you the headache now…)
- Webflow’s hosting is built into the CMS. Your site will be hosted by AWS, and you won’t have to worry about picking a provider or if your plan can support your needs. Hosting on Webflow is $276/yr for the CMS plan.
WordPress is a great option for folks who are already familiar with the platform, have specific publishing needs, or have sites that don’t require a ton of design edits.
However, Webflow is becoming a choice platform by startups, nonprofits, enterprises, and creators because of its ease of use, versatility, and array of features.
That’s why at Slam we hyper focus on Webflow design & development, and are certified Webflow professionals. We’ve found that Webflow is a powerful tool for collaborative teams, and we’ve helped dozens of organizations transition their sites from WordPress to Webflow.
If you want to read more about it, we made a guide on Webflow vs. WordPress.
Migrate from WordPress to Webflow
If you’re ready to migrate your WordPress to Webflow, we got you covered. While this might seem overwhelming, the process is pretty straightforward because Webflow has made it easy to transfer all your content.
Here are the steps:
- Export WordPress content
- Import WordPress content to Webflow
- Build and design your site in Webflow
- Setting up redirects from WordPress to Webflow
- Managing redirects in Webflow
Export WordPress Content to Webflow
If you’ve been publishing blog content to WordPress, there’s a simple way to export all your content from WordPress and import it into Webflow. The WP All Export plugin from Soflyy we’ve used on several sites, and makes it easy to transfer content between the two platforms.
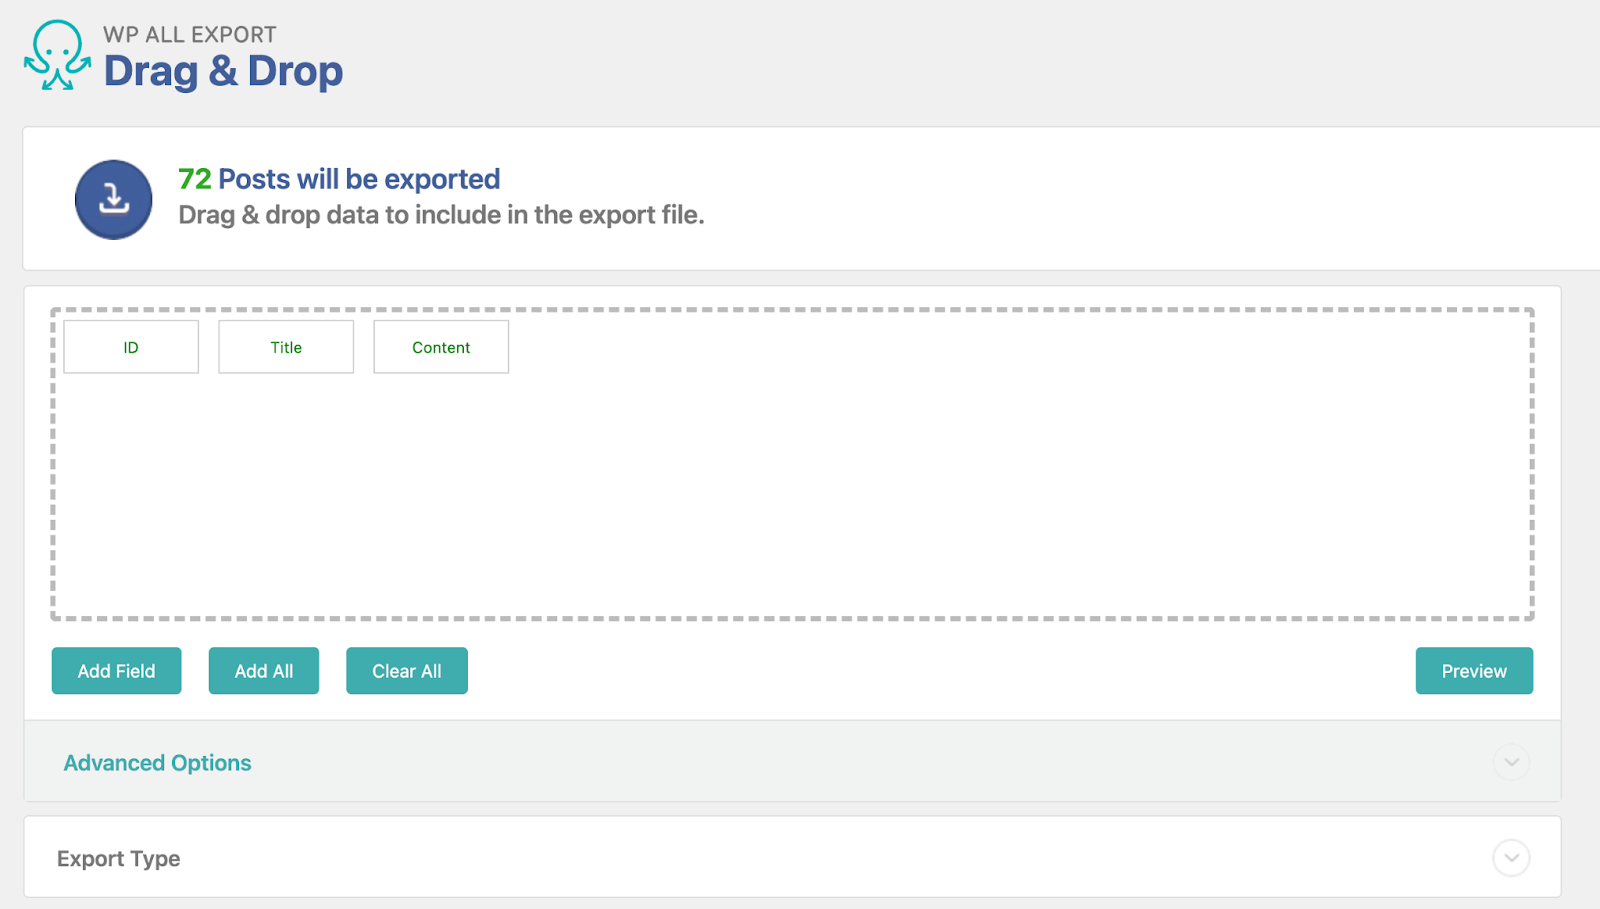
Once you install the plugin on your site, you can customize the fields in the export. WP All Export allows you to drag and drop fields from your WP Posts (or any other CMS) to format the columns of your CSV.

Once you complete the process, all posts will download in a CSV. Open up your CSV in your preferred editor (Excel, Numbers, Google Sheets, Airtable, etc.) to see the formatting.
One important thing to note: If your content in the CMS was designed by a visual editor or includes tables, embeds, or shortcodes, you will need to reformat your piece. My recommendation here is to import it as is into the Webflow Editor vs edit on the CSV so it’s a bit easier to see.
If you haven’t already, make sure your CMS in Webflow is set up. If you’re transferring a blog, Webflow has a pre-designed blog CMS for you to use as a starting point. If there is no content in the CMS already, create one sample record with Lorem Ipsum.
Next, download a CSV of this Webflow collection. This will allow you to see the CSV formatting and make any bulk edits, like authors or tags.
After the CSV is downloaded, it’s time to consolidate into one spreadsheet that we can upload to Webflow. Column by column, copy and paste the content from the WP export to the new Webflow one you just created. Be sure to also remove the sample record you created earlier. It’s okay to leave fields blank during this stage.
Finally, it’s time to upload this CSV to Webflow. If you don’t have a Webflow project, it’s time to create one.
Import CSV data from WordPress to Webflow
Here are the next steps:
- Open the “Collections” tab and create a new Collection
- Import the CSV you just exported
- Map the fields from the CSV file or create new fields
Note that importing CSV files into your destination project can be limited based on the hosting plan you have. For instance, if your current plan does not support a CMS or Business hosting, you may need to add or upgrade your hosting plan to import a CSV file with more than 50 Collection items.
Launching a new website? Don’t get the pre-launch scaries. The QA process doesn’t have to create stress. Download our FREE website launch checklist template for launching Webflow sites and make sure your launch slam dunks.
This process is easy to replicate with any CMS that you have in your WordPress site, too. It’s also a great way to create new CMS items at scale from a spreadsheet.
I’ve used this technique for a venture capital client who wanted to create CMS pages in Webflow for each of their portfolio companies. We transferred data from their portfolio spreadsheet, manipulated the data, and then uploaded the CSV to deploy 100+ pages at once.
Build and Design Your Site in Webflow
Whether you’re a restaurant or a filmmaker, or a nonprofit, getting started on Webflow is easy. Getting ready on Webflow is similar to other processes. You have to:
- Plan your sitemap
- Pick a direction on the branding (or use a template)
- Design all your pages
- Add all your content
- Add all the integrations and softwares
- Add meta tags for SEO
- Set-up any redirects (more on this later)
- Set-up your Google Analytics
- QA
- Launch your website
The plus about Webflow is that you can use Webflow’s hosting service. Webflow also has a University hub for you to learn how to do each step.
If you’re looking to hire a Webflow developer, reach out to us ASAP!
We work with startups, nonprofits, small businesses, universities, and Fortune 500 companies to help them both make organic search their #1 marketing channel and design beautiful web experiences. We've worked with companies like Kai XR, Worklife, Intrax, Peer Health Exchange, University of Chicago, Northwestern University!
Here's more about some of our work:
- We destroy the game in creative website design and development. We are masters in both Webflow and WordPress. We're always focused on giving our clients' sites a fresh, modern, and impressive brand image. Our vision is to ensure the site is visual, informative, and encourages the user to engage. You only have 1 chance to make a first impression, so let's impress them!
- Our project objectives are to make your brand look 10x better than the next competitor. How? Visual storytelling, powerful growth-driven CMS, improving conversion, etc!
- We build speedy, scalable, stunning Webflow websites that rank for SEO from day 1.
Setting up Redirects from WordPress to Webflow
To manage redirects from WordPress to Webflow, you will need to set up 301 redirects.
A 301 redirect is a permanent redirect that tells search engines and browsers that the original URL has moved to a new location. This will ensure that your website visitors and search engines are redirected to the new Webflow URL, and your site's SEO is not negatively affected. If you need to redirect temporarily, use a 302 redirect instead, though we highly avoid this. If you don’t know anything about SEO, feel free to download our SEO terms guide explained.
If you want to see all the pages on your WordPress site, you’ll need to use Google XML Sitemaps, a plug-in for WordPress that generates an XML sitemap for your website, which is used by Google to crawl and index your pages. You can also use Yoast SEO.
Once you install it:
- Log in to your WordPress site and navigate to the Google XML Sitemaps plugin settings page.
- In the settings page, you'll see a section labeled "Sitemap Contents" that lists all the pages, posts, and taxonomies on your site that will be included in your sitemap.
- To view your sitemap, simply click on the "XML Sitemap" button at the top of the page. This will open your sitemap in a new tab in your web browser.
- You’ll be able to see all pages. We recommend moving them to a spreadsheet so you can start cross-referencing and identifying what you want to kill or redirect.
Your sitemap URL will look something like this: https://example.com/sitemap.xml
Once you have this rolling, it’s time to set-up redirects from WordPress to Webflow. Here’s how:
- Install the Redirection Plugin. This plugin is free and can be easily installed from the WordPress plugin repository.
- Once you've installed the Redirection plugin, go to the plugin settings page and click on the "Add New" button. Enter the old URL (from your WordPress site) in the "Source URL" field, and the new URL (from your Webflow site) in the "Target URL" field. Make sure to select the "Regex" option in the "Match" field.
- Test the Redirects: After setting up the redirects, test them by entering the old URLs into your browser, and make sure they are properly redirecting to the new URLs on your Webflow site.
- Update Google Analytics: If you are using Google Analytics to track your website traffic, make sure to update your Analytics tracking code on your Webflow site.
- Update Google Search Console and sitemap: Reindex your pages and your sitemap
Manage Redirects in Webflow
If you’re looking to set-up redirects within Webflow is SUPER smooth because you don’t need to download any plugins. Below are the steps to follow:
- Identify pages to redirect, note the old URL slug and the new URL slug.
- Open your Webflow project and go to the Project settings from the bottom of the left-hand panel.
- Click on the "Add redirect" button to create a new redirect.
- In the "Old page" field, enter the URL of the old page you want to redirect from (e.g. /old-page.html).
- In the "New page" field, enter the URL of the new page you want to redirect to (e.g. /new-page.html).
- Click on the "Save" button to save the redirect.
- Resubmit your sitemap on Google Search Console to make sure this is done properly!
Additionally, Webflow also offers wildcard redirects, which allow you to redirect a whole directory or set of pages. To set up a wildcard redirect, simply enter the directory or set of pages you want to redirect in the "Old page" field with an asterisk (e.g. /directory/* or /blog/*).
Moving from WordPress to Webflow? We can Help!
At Slam, we understand that making the switch from WordPress to Webflow can seem overwhelming. That’s why we offer professional migration services to help make the transition as smooth as possible.
Our certified Webflow professionals can assist with everything from exporting your WordPress data to setting up redirects and designing your new Webflow site.
With Webflow, you’ll have access to a powerful, intuitive platform that offers a wide range of features and benefits. Whether you’re a startup, nonprofit, enterprise, or creative individual, Webflow can help you build and maintain a professional, modern website that meets your unique needs.
So if you’re ready to take your website to the next level, let Slam help you make the switch to Webflow. Contact us today to learn more about our migration services and how we can help you achieve your website goals.
Liked this? You’d also want to read these:
.webp)
.webp)


